How we Finished our Basement to Create a Multipurpose Family Space
- Jul 5, 2024
- 6 min read
Updated: Jun 24, 2025
Making more space in our home for our growing family without adding square footage
This post contains affiliate links, which means I may earn a small commission if you make a purchase through them—at no cost to you. I only share products I truly love or use in my own home.


My husband and I found out we were pregnant with our second child when our first son was just turning one. We had many thoughts…First - WHAT. Second- WHAT a blessing! Third-we need to move! We were living in our first home, a cozy 1400 square foot cape cod house that we purchased in 2019 with an amazingly low mortgage interest rate. We had always intended that this house was a starter home–we would live there for 3-5 years or until we had 2 kids because we knew we would need more space. Well, the 2 kids part happened sooner than we anticipated.
After consulting with a realtor and looking at a few (kind of) bigger houses, we made the decision that it was not time to move yet. We were being met with the reality of the 2022 housing market with a low supply of houses to purchase–especially in our price range—and rising mortgage interest rates. We decided to invest the money we were saving for a down payment into mini renovations to our house that would make it a more comfortable and practical house for a family of 4.
To accommodate another little one, we planned to turn the combined home office / playroom in our upstairs loft area into the new baby’s queen suite and made some adjustments to make it a true bedroom like installing a door and a mini split. This took away the area we had been using as a play space, and we knew we’d need more of that with another baby. Where would we put all these toys? Where would we play and burn energy in the depths of Wisconsin winter when going outside was torture? And how could we get more space in our house without the $200k+ price tag we received from a couple contractors when we inquired about house additions??
The magical answer: finish the basement!


A bunch of our stuff that could find somewhere else to be stored in our attic or garage or garbage. And some of our friend Steve's stuff we were storing and promptly kicked out...
We had a good amount of space in our basement that was being taken up by junk that we could find somewhere else to store. Finishing the basement would also not require new structures to be built beyond wall framing, so a dramatically less involved process than a home addition. By the time we were able to decide how we were going to accommodate our growing family we didn’t have much time before baby #2 arrived, and the basement renovation was planned to take just 8 weeks which was manageable for us.
So, here’s the steps for how we transformed our unfinished basement into a multi-use family space for $25k!
1. Find Inspiration and plan look & feel
I scanned Pinterest for inspiration and saw a lot of basements finished with painted ceilings in place of adding new drop ceilings, and loved that industrial look. I also loved the idea of saving some money with that look as well! I also loved a look that was light, simple, and Scandinavian looking and used that as inspiration with picking out paint colors and overall decor.
Painting basement ceilings is apparently a big trend right now. I saw pictures of both black and white painted ceilings, but we decided on black since we felt it would hide more imperfections. To paint the ceilings, paint is sprayed all over all the electrical, pipes, beams, and whatever else you have on your basement ceiling which feels wrong but is apparently OK and it looks super clean!
The paint color we decided on would add some warmth to offset the black – I loved the truffle color of our bathroom but didn’t have any record of what the actual paint color was so I chipped some of that paint off our bathroom wall and brought it to the local Sherwin Williams to color match– easy peasy! See more about our carpet color choice below…
2. Map out the basement area to be finished
We didn’t have the entire basement space finished, but left some of it as-is since other spaces wouldn’t require climate control and aesthetic finishing. We identified the area to be finished that would optimize the amount of space we wanted while avoiding placement of the water heater, furnace, and washer / dryer. This led to us deciding to separate out three general zones we wanted for the basement, including just one of those zones to be finished:

Zone 1- Workroom / husband storage area: leave unfinished
This area was already closed off from the rest of the basement with its own door
Zone 2-Laundry room/ additional storage area: leave unfinished
Based on the placement of our furnace and laundry, there was a clear rectangular-shaped area that made sense to become its own space that we didn’t need to have finished.
Zone 3- Play space / home office area: finish!
Based on where the workroom and laundry room were we were able to identify a straight line down the middle of the basement where we would wall off the new finished space.
We aligned the wall needed to separate the new space from the laundry room with the already existing wall of the workroom–essentially extending that wall but with the staircase in between.
The finished area could’ve been separated into creating 2 new spaces since we needed a home office space plus kids’ play space, but I liked the idea of being in a more open area vs. confining myself into a smaller office space with a desk, and I knew that most days when I would be working the kids would be at daycare, so we decided on the one larger room versus separating the finished area into two rooms. It also allows for a lot more running and use of more space for playing!
3. Hire contractor
We had friends who recently hired a contractor they loved for a big home project and reached out to him about the needs we had to adapt our house for the upcoming bebe. He happened to be just completing another basement finishing project and we liked the work so brought him in to help us out! Knowing our friends had a good experience with him and that referral were key in knowing he was someone we could trust.
4. Renovate!
These are the steps it took to actually renovate our basement.


Install framing for walls
Wire for electrical and for heated baseboards
Install recessed lights
Install drywall
Paint ceiling
Paint walls
Install doors
Install carpet
Our contractor installed the wall framing, did electrical wiring, installed doors and painted, while he subcontracted out the drywall install. Carpet was installed by Carpetland USA! I’ve heard of floor leveling being needed in some basement finishing projects, but it wasn’t something we needed as the space was rather level and didn’t have any floor drains.
5. Decorate
Last but not least and a step that is still a work in progress 2 years later (because #kids and #werk) is adding finishes and decor!


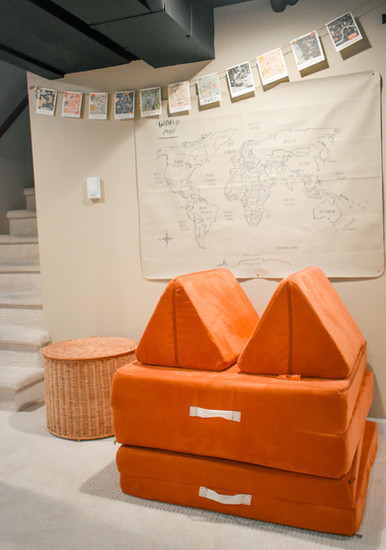


One of the big reasons we wanted this basement space was for kids’ play and toy space, so storage was key. We decided to install 4 IKEA Brimnes cabinets next to each other for easy toy access (and toy-hiding when doors were closed). This also allowed us space to place a TV. A year and a half later I decided to purchase another one to put in an available space to add even more storage. Home takes time people! Living in the space daily allowed us to see the need for more storage – something we didn’t know until experiencing that need. I replaced the handles that came on the cabinets with these black ones for a little contrast.
Decorating the basement has been a work-in-progress as we continue to identify our needs and also combine the environment of a play space, my home office, and just a place that we generally are in a lot together as a family. More on play space decor pieces here and on my home office space here!
Ways we saved money on the basement finishing project:
Painting the existing ceilings all black instead of installing drop-down ceiling (I love this look too! Very industrial-chic…)
Bought multiple IKEA storage cabinets instead of custom cabinetry
Purchased one of the doors from a door resale shop
I liked the idea of a ‘barn door’ that I now am indifferent about but it adds an interesting design element. We installed the used door on a track to get this effect.
Ways we lived dangerously with the basement finishing project:
Installing white carpet in a space that would be trampled on by toddlers

So far it has survived a major pureed sweet potato spit-up situation, infinite play dough dropping on the floor, and a toddler sneak attack on me while i was holding a full cup of coffee. Shoutout to Folex carpet cleaner for helping
That about sums it all up– how we finished our basement to accommodate our growing family while not needing to give up our 2019 mortgage rate! Like I said, it’s all still a work-in-progress, changing as we do. And that’s what home should be.


What color did you end up using for the walls? Do you have the color name thru Sherwin Williams
Amazing and great playtime being had by children and Mom and Dad!